> ## Documentation Index
> Fetch the complete documentation index at: https://docs.brainstormer.io/llms.txt
> Use this file to discover all available pages before exploring further.
# Publishing Agents
> Take your agent from draft to live with the publish workflow, preview chat, and approval process.
Every agent starts in **draft** mode. The publishing workflow lets you test, review, and deploy your agent with confidence before making it available to users.
## Draft vs. Published
| State | Who Can Access | Purpose |
| ------------- | ------------------------------------------ | ---------------------- |
| **Draft** | Only organization members with edit access | Testing and refinement |
| **Published** | Anyone with the public link | Live deployment |
Draft agents are fully functional — you can chat with them, test knowledge base retrieval, and verify prompt behavior. The only difference is visibility: draft agents are not accessible outside your organization.
## Preview Chat
Before publishing, use **Preview Chat** to test your agent as an end user would experience it:
1. Open your agent's settings.
2. Click **Preview Chat** (or the preview button).
3. A chat interface opens showing exactly what users will see.
4. Test various questions, check citations, and verify the welcome message.
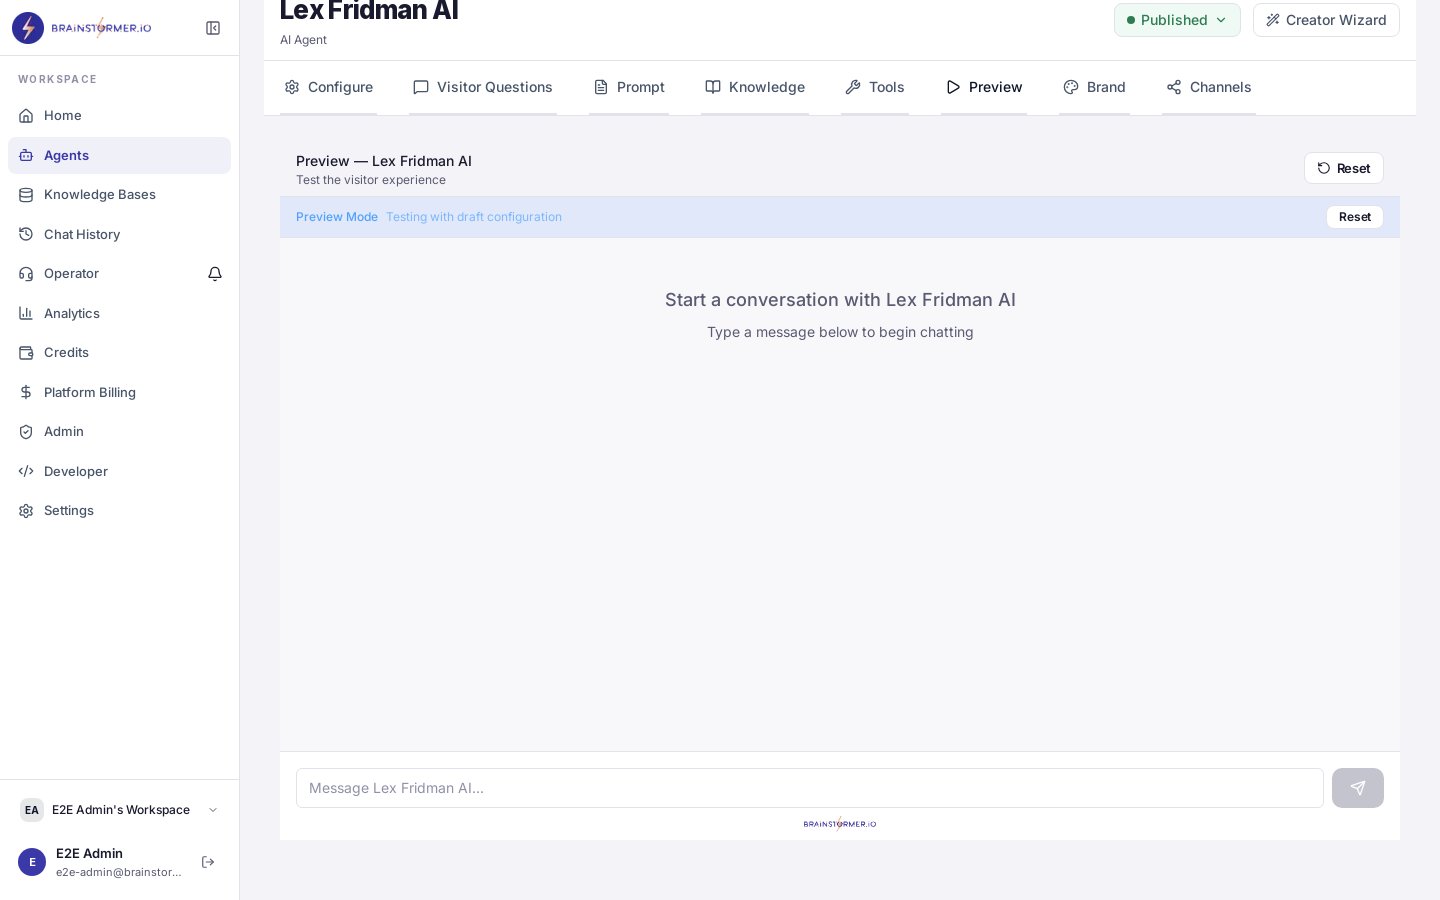 Preview Chat uses the same configuration as the live agent — same model, same prompts, same knowledge bases. What you see is what your users will get.
Test these scenarios in Preview Chat before publishing:
* The welcome message (does it display correctly with variables?)
* Questions that should hit your knowledge base (are citations accurate?)
* Questions outside your knowledge base (does the agent handle them gracefully?)
* Edge cases and adversarial inputs
## Publishing Your Agent
Make sure your agent has:
* A clear, well-tested system prompt
* An appropriate model selected
* **At least one knowledge base linked and indexed** (required before publishing)
* A welcome message configured (optional but recommended)
Click the **Publish** button on your agent's page. This starts the publish process.
If your organization has the **require publish approval** setting enabled, your publish request enters a review queue. An organization admin or owner must approve it before the agent goes live.
You will see a status banner showing the current state of your publish request:
* **Pending approval** — Waiting for an admin to review
* **Approved** — Published and live
* **Rejected** — Returned with feedback; make changes and resubmit
Organizations can enable or disable the approval requirement in **Organization Settings**. When disabled, publishing is immediate.
Once published (or approved), your agent is accessible at its public URL:
```
https://your-platform.com/a/your-agent-slug
```
Anyone with this link can start a conversation with your agent.
## Distribution Options
Published agents can be accessed in several ways:
### Public Agent Page
Every published agent gets a dedicated page at `/a/your-agent-slug`. This page is publicly accessible and requires no authentication. Users can start chatting immediately. This is the primary way to distribute your agent today — just share the link.
You can pass custom variables and context tokens through the public page link as `var_`-prefixed query parameters for personalized experiences.
### Embed Widget
Drop a floating chat widget onto any website. In the agent editor, open the **Channels** tab → **Embed Widget** and copy the snippet:
```html theme={null}
```
Paste it before the closing `` tag of any page. A launcher button appears in the corner; clicking it opens your agent's chat in a panel. `data-color` (launcher color) and `data-position` (`right`/`left`) are optional. The agent must be **published** and not require login to be embedded anonymously.
### API Access
Call your agent directly via the API for integration with your own applications:
```
POST /api/bots/:id/chat
{
"message": "Hello",
"stream": true
}
```
## Knowledge Base Readiness
Before an agent can be published, it must have **at least one linked knowledge base** and **at least one indexed document** in that knowledge base. This ensures the agent can retrieve grounded context when answering questions.
You will see one of these states on the publish screen:
| Status | What it means | Can you publish? |
| ---------------------------------- | ------------------------------------------------------ | ------------------------------------------------------- |
| **Checking knowledge base status** | The platform is verifying your linked knowledge bases. | No — wait for the check to complete. |
| **No knowledge base linked** | The agent is not linked to any knowledge base yet. | No — link a knowledge base first. |
| **Knowledge base still indexing** | Documents are being processed and embedded. | No — wait for at least one document to finish indexing. |
| **Ready** | At least one document is indexed. | Yes. |
If publishing is blocked, the message explains why:
> At least one knowledge base must be linked and have indexed documents before this agent can go live.
Indexing happens automatically after you upload documents or connect sources. You do not need to leave the page — the status updates as documents finish.
## Unpublishing
To take an agent offline, click **Unpublish** on the agent's page. The agent returns to draft state immediately. The public URL and widget will stop working, and users will see an unavailable message.
Unpublishing does not delete any data — conversations, configurations, and knowledge base links are preserved. You can republish at any time.
## Version History
Every time you update a published agent, the change is tracked in version history. You can:
* **View all versions** — See a timeline of changes with changelogs
* **Compare versions** — See what changed between versions
* **Roll back** — Restore a previous version if a change causes issues
Rolling back creates a new version entry rather than rewriting history, so you always have a full audit trail.
Preview Chat uses the same configuration as the live agent — same model, same prompts, same knowledge bases. What you see is what your users will get.
Test these scenarios in Preview Chat before publishing:
* The welcome message (does it display correctly with variables?)
* Questions that should hit your knowledge base (are citations accurate?)
* Questions outside your knowledge base (does the agent handle them gracefully?)
* Edge cases and adversarial inputs
## Publishing Your Agent
Make sure your agent has:
* A clear, well-tested system prompt
* An appropriate model selected
* **At least one knowledge base linked and indexed** (required before publishing)
* A welcome message configured (optional but recommended)
Click the **Publish** button on your agent's page. This starts the publish process.
If your organization has the **require publish approval** setting enabled, your publish request enters a review queue. An organization admin or owner must approve it before the agent goes live.
You will see a status banner showing the current state of your publish request:
* **Pending approval** — Waiting for an admin to review
* **Approved** — Published and live
* **Rejected** — Returned with feedback; make changes and resubmit
Organizations can enable or disable the approval requirement in **Organization Settings**. When disabled, publishing is immediate.
Once published (or approved), your agent is accessible at its public URL:
```
https://your-platform.com/a/your-agent-slug
```
Anyone with this link can start a conversation with your agent.
## Distribution Options
Published agents can be accessed in several ways:
### Public Agent Page
Every published agent gets a dedicated page at `/a/your-agent-slug`. This page is publicly accessible and requires no authentication. Users can start chatting immediately. This is the primary way to distribute your agent today — just share the link.
You can pass custom variables and context tokens through the public page link as `var_`-prefixed query parameters for personalized experiences.
### Embed Widget
Drop a floating chat widget onto any website. In the agent editor, open the **Channels** tab → **Embed Widget** and copy the snippet:
```html theme={null}
```
Paste it before the closing `` tag of any page. A launcher button appears in the corner; clicking it opens your agent's chat in a panel. `data-color` (launcher color) and `data-position` (`right`/`left`) are optional. The agent must be **published** and not require login to be embedded anonymously.
### API Access
Call your agent directly via the API for integration with your own applications:
```
POST /api/bots/:id/chat
{
"message": "Hello",
"stream": true
}
```
## Knowledge Base Readiness
Before an agent can be published, it must have **at least one linked knowledge base** and **at least one indexed document** in that knowledge base. This ensures the agent can retrieve grounded context when answering questions.
You will see one of these states on the publish screen:
| Status | What it means | Can you publish? |
| ---------------------------------- | ------------------------------------------------------ | ------------------------------------------------------- |
| **Checking knowledge base status** | The platform is verifying your linked knowledge bases. | No — wait for the check to complete. |
| **No knowledge base linked** | The agent is not linked to any knowledge base yet. | No — link a knowledge base first. |
| **Knowledge base still indexing** | Documents are being processed and embedded. | No — wait for at least one document to finish indexing. |
| **Ready** | At least one document is indexed. | Yes. |
If publishing is blocked, the message explains why:
> At least one knowledge base must be linked and have indexed documents before this agent can go live.
Indexing happens automatically after you upload documents or connect sources. You do not need to leave the page — the status updates as documents finish.
## Unpublishing
To take an agent offline, click **Unpublish** on the agent's page. The agent returns to draft state immediately. The public URL and widget will stop working, and users will see an unavailable message.
Unpublishing does not delete any data — conversations, configurations, and knowledge base links are preserved. You can republish at any time.
## Version History
Every time you update a published agent, the change is tracked in version history. You can:
* **View all versions** — See a timeline of changes with changelogs
* **Compare versions** — See what changed between versions
* **Roll back** — Restore a previous version if a change causes issues
Rolling back creates a new version entry rather than rewriting history, so you always have a full audit trail.